Saturday, December 3, 2016

Habanero Coconut Margarita

There is a restaurant in Cowtown with amazing Margaritas. The kinds that I dream about when I'm craving it. (They have great tacos too, but that's another story). The problem with this place is that it is in Calgary, and I live in the 'burbs. Yes, yes I know suck it up and go, but the plain truth of the matter is that with everything else that goes on in our ives, my cravings for tacos and margaritas don't get to rank that high on the priority list. So let's figure out a solution… make it myself. I found a couple of recipes online, tinkered and smashed them together and made a night of it.


Habanero Coconut Simple Syrup
1 cup water
1 cup white sugar
2 to 3 Habanero peppers quartered with seeds.
1 tbsp coconut extract

Directions:
Boil water, add sugar and let it dissolve for 2-3 minutes.
Add quartered habanero peppers and let it simmer for 15 minutes, stir occassionally
Turn off heat and let syrup "steep" with the peppers for a minimum of an hour.
Let it steep longer for more heat.
Drain using cheese cloth.
I pulled all pieces except 1 out and let that last piece steep overnight.
Add coconut extract and store in a glass container. 
A mason jar is perfect, not to pour, but to store.


Coconut-chili margarita
1 oz tequila
1/2 oz triple sec (optional) 
3/4 oz fresh lime juice
1/4 oz fresh lemon juice
1/2 oz habanero coconut syrup
Coconut sugar rim (exactly what you think it is. You can use normal white sugar, but larger crystals are better)

To rim glass take a spent lime and run it around the edge of the glass. 
Turn the glass over and run it into the coconut sugar.
Add ice to glass.

In a shaker combine tequila, triple sec, lime and lemon juice, and coconut syrup, and shake with ice. 
Strain into the coconut sugar rimmed glass full of ice.


Thursday, December 1, 2016

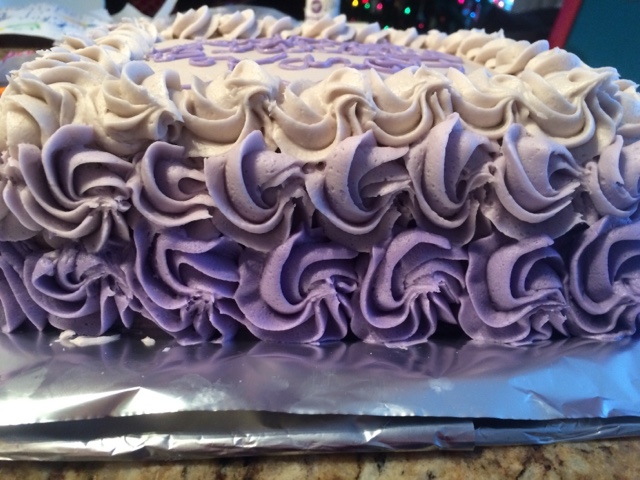
Ombré Cake

Pretty and easy.
The inside matched the colour on the outside too.
The writing wasn't my best effort, but I was super pressed for time!


Wednesday, November 30, 2016

Eggnog Cheesecake


This was a challenge that a friend from work put to me. She said she had seen a picture of a cake like this online and it looked tasty. So I set out to make one. I took a look at 3 or 4 similar recipes and tinkered to make it a little easier and more her taste. I used rum in place of the extract. I was quite liberal with the 1 tbsp because I think it adds a nice punch, I used good dark spiced rum from Turks and Caicos.


For the Crust:
1/2 cups graham cracker crumbs
1/3 cup white sugar
6 tbsp melted butter
1 tbsp ginger
-you could use fresh or powdered. If you use fresh, you don't need as much, but powdered you might want more if you really want that finer flavour.
1/2 tbsp cinnamon


For the Filling:
4 (8 oz.) packages softened cream cheese
4 large eggs
1 1/2 cups egg nog
1 1/4 cups white sugar
3 tbsp AP flour
1 tbsp rum
1 tsp cinnamon 


The Crust:
Assemble the crust ingredients in a bowl and mix well, then dump the contents into a greased, parchment bottom lined spring form pan.
I was taught by my mother in law that if you have a tall, straight, smooth glass or vase in the house you can use it to press the crumbs to the side of the pan and it looks a lot cleaner than using your hands. If you make sure the crumbs are pressed down well and into the sides well, the whole cake stays together a lot better and looks cleaner too.

The Filling:
In your Kitchen Aid with the whisk attachment whip the cream cheese until fluffy. My poor machine hates me already from all the Christmas baking, but this make it very warm indeed.
Add the eggs one at a time and scraping down the sides and bottom after each egg.
Add in the egg nog and the rum and mix until smooth, scraping down the sides again.
Mix together the flour, sugar and cinnamon in a small bowl and add slowly into the cream cheese mixture and whip until smooth again.
Make sure you have no lumps that haven't been incorporated into a smooth mixture. You want a nice uniform mixture when you pour it into the crust.
Carefully pour the cream cheese mixture into the crust, set on a baking tin and put into a 325 degree oven for an hour.
Once the hour is up, leave the cake in the oven, open the oven door a crack and leave it another hour.
Move to a cooling rack to come to room temperature.
Cover and put into the fridge to chill overnight.
At this point, I had actually frozen the cheesecake because I used the "big outside fridge" (aka outside in winter).
I whipped a pint of whipping cream and added just a little sugar to take the bite out of it.
I decorated the edges with rosettes, with one large rosette in the middle and dusted with a little cinnamon to make it pretty.

Wednesday, November 23, 2016

Loves in a lifetime

I read this, posted by someone on FB and it resonated with me, it made sense of a topic that has absolutely no sense. It's one of those pieces that quiets your soul for a moment and a peace can be attained. It seems a little on the hyperbole side of things, but it really did make me pause.
It was of course without credit, but I believe I have found the original source. If I haven't, I apologize and please correct me.


It’s been said that we really only fall in love with three people in our lifetime. 
Yet, it’s said that we need each of these loves for a different reason. 
Often our first is when we are young, high school even. It’s the idealistic love; the one that seems like the fairytales we are all read as children. 
It’s a love that looks right. 
The second is supposed to be our hard love; the one that teaches us lessons about who we are and how we often want or need to be loved.
Sometimes it’s unhealthy, unbalanced or narcissistic even. 
It’s the love that we wished was right.
And the third is the love we never see coming. The one that usually comes dressed as all wrong for us and that destroys any lingering ideals we clung to about what love is supposed to be. 
It’s the love that just feels right. 
Maybe we don’t all experience these loves in this lifetime; but perhaps that’s just because we aren’t ready to. 
Possibly maybe we need a whole lifetime to learn or maybe if we’re lucky it only takes a few years. 
And there may be those people who fall in love once and find it passionately lasts until their last breath. 
Someone once told me they are the lucky ones; and perhaps they are.
But I kinda think that those who make it to their third love are really the lucky ones.
They are the ones who are tired of having to try and whose broken hearts lay beating in front of them wondering if there is just something inherently wrong with how they love. 
But there’s not; it’s just a matter of if someone loves in the same way that they do or not. 
And maybe there’s something special about our first love, and something heartbreakingly unique about our second…but there’s also just something about our third.
The one we never see coming.
The one that actually lasts.
The one that shows us why it never worked out before. 
And it’s that possibility that makes trying again always worthwhile, because the truth is you never know when you’ll stumble into love.
#thethreeloves #katerose #mayitbeofbenefit

Friday, November 18, 2016

Ham cheese and bacon scones

400° oven, preheated

2 1/2 cups AP flour
1/2 tsp salt
1/4 tsp pepper
1 tbsp baking powder
1/2 tsp baking soda
1 tbsp onion powder
1 tbsp garlic powder

1/4 cup light brown sugar no lumps
1/2 cup very cold butter
1 large egg
1/2 cup plain yogurt
2 tbsp a butter milk
1/3 cup chopped ham
1/2 cup shredded cheese (cheddar, Swiss whatever)
1/4 cup bacon bits


Mix all dry ingredients together in a large bowl.
Cut in cold butter and use your hands (or pastry knife) to turn into sand like crumble. I always started out with a pastry knife and give up and use my hands because it works better and I can get a good idea on the consistency. You have to work quickly if you use you hand as the heat from your hands can melt the butter.
Mix together wet ingredients and then dump into sand mixture and mix until just combined.

Add in the cheese and meats and fold in using your hands. Again it's just easier and quicker and you'll need your hands in the next step anyhow.
Dump on parchment paper
Form into disks and cut into 8's or more depending on desired scone size.
You can form into 2 smaller disks if you don't want monster scones.

Bake for 20-25 minutes


Butternut Squash Apple Soup

Soup. It always gets to this point in the year and we crave soup.
T loves it, b loves it, I love it and t hates all soup that isn't Lipton's shocking yellow stain inducing "chicken" noodle.

1 butternut squash chopped
1 sweet potato chopped
1 onion chopped
1 Apple chopped
1 tbsp Cinnamon
1 tbsp Ginger
1/2 tbsp Curry
1/2 tbsp Allspice
1/2 tbsp Cumin
1 tbsp (or more to taste) Flaked chilli peppers
4 cloves of Garlic winced
5 or 6 cups of Chicken stock

Throw all ingredients except the chilli flakes into a slow cooker, heavy pan or dutch oven.
Cook until vegetables are softened.

If you use the slow cooker:
This can be dumped into the slow cooker first thing in the morning and left to simmer on low until the evening.

If you want faster soup for supper immediately, use a dutch over or sauce pan and bring everything to a boil and drop the heat down to a simmer until veggies are knife tender.

I add the chilli flakes in last. Both T and I love the heat, but the kids don't. We will separate the batches for them and add in the spice to our own soup to taste.

This is a go to with Ham, cheese and bacon scones….


Sunday, November 13, 2016

Creeper

The creeper cake.
t's 8th birthday cake was a much needed easy, peasy cake.
Just 2 cake layers, sliced in half and assembled with buttercream icing.


Left outside in the -40 degree weather to freeze set.
I trimmed the edges of the cake to square it off a little more and used more buttercream to flatten the top.


It's ugly under the fondant, but it works.
Using LOTS of spray coconut oil and a very clean, flat work surface (solid countertop) roll out the fondant as thinly as possible. Make sure the piece is larger than your cake surface, including sides.
Lay it over the cake and begin to smooth it out.
Trim away excess fondant.
Using an 8x8 grid system on paper lay out your creeper face.
I took a piece of paper the same size as the top of the cake and folded it in half enough times to create a grid with the face. It was easy and quick.
I bought already green fondant this time (as my poor Kitchenaid will not be able to handle another fondant making session without smoking and emitting an awful sound/smell)
I added gel colour to get a few different shades of green. Yellow and darker green.
I also took a small amount of green and added black gel colour for the face.
After rolling out the Using a small paring knife a cut out the squares and place in order on the cake, alternating greens and affixing the black face pieces as the green shows.

I piped green buttercream icing around the bottom of the cake and corners to clean up the cake for a finished look.

This is a large cake and feeds a lot of people! We had 9 little boys and a smattering of parents and still took more than half the cake home to feast on for the week!


***Update***

I did a second Creeper cake for the schools Cake Walk fundraiser.
It was just as easy, but it is a long process. Easy, not quick.


Saturday, October 29, 2016

Witches costume

Lions and tigers and bears oh my!


She wanted to be the wicked witch of the West for Hallowe'en, so I found an old pattern. Well I didn't find it, I looked everywhere for it starting in September, but no one had it. A friend had the old adult size of the Simplicity Pattern (7808) and away I went. I had to tinker and edit the pattern to fit a 5 year old, which worked out well except the bodice that I went a little too tight with. Well I also may or may not have sewed the skirt on wrong 4 times. FOUR. I am out of practice.

I started in September and finally finished today. She loves it and I just need to find the green paint.

Tuesday, September 13, 2016

Swiss char harvest

Perpetual rain and being left to its own devices all summer leant to a bumper crop of tomatoes, char and 4 pathetic mini pumpkins!

Sunday, May 22, 2016

Cabernet Cherry Jam

I have a freezer full of fruit from last summer that needs to be eaten before this years fruit starts coming out and I end up with more fruit than I know what to do with. I am going away next weekend with some friends and needed to make a jam or preserve to go on top of Brie. I found cherries and blueberries in there. I went with the cherries because I knew I could add in pepper and the left over Cabernet we'd had for supper the night before. I didn't want too sweet, and not too much heat from the pepper, just enough to give baked Brie a kick. My starting off point included a recipe from a friend. She also had a few other ingredients I left out to make it that much more simple.
I turned out quite well. I can't wait for Brie. 


8 to 10 cups cherries
(I used bing, Queen Anne and sour)
1 1/2 - 2 cups sugar (white or cane)
1 cup Cab Sauvignon or Cab Merlot
1 to 2 tsps fresh ground pepper
Juice of one lemon (about 1/2 a cup)
2 pouches of certo


In a heavy bottomed pan or Dutch oven mash the cherries.
Add the sugar into the pan and mix well. Cook for 5-10 minute to release juice from the cherries.
Add in wine, lemon juice and pepper and bring to a hard boil.
Let boil 15-20 minutes.
I took an immersion blender to my jam to make it less of a preserve and more jam.
Let cook a few more minutes.
Add in the certo and cook 5-10 more minutes until you get the desired jam consistency.
Put the jam into hot, prepared jars.
Boil in canner for 15 minute and then let sit another 5 minutes.
Allow to cool on a towel overnight.
Should be shelf stable.
It made 2 full pint jars and one half pint jar with a ramekin full for kids to eat on toast. 


Monday, April 18, 2016

Vanilla cake with carmel sauce


This is a recipe T's mum used to make. It's sweet, it's quick and it's like I'm 18 again. 


Cake:

1 cup softened salted butter
2 cups white sugar
4 large eggs at room temp
2 tbsp vanilla
1/4 vanilla bean pod, scraped
2 3/4 cups all purpose flour, sifted
2 1/4 tsp baking powder
1 cup milk


Directions:
Oven at 350 degrees.
Grease and flour one 9 inch cake pan and line 6 muffin cups.
In a bowl mix together flour, baking powder, and salt together.
In a kitchen aid bowl beat the butter until fluffy. Add the sugar and mix until fluffy. Add the eggs one at a time, and mix thoroughly.
Add in the vanilla.
Add in the flour and milk, alternating until finishing with the flour.
Bake the cupcakes for 25-30 minutes or when a toothpick inserted in the center  comes out clean.
Bake the cake for 35-40 minutes until toothpick cooked.


Sauce:
1 1/4 cup brown sugar
1 1/2 tbsp flour
1/4 to 1/3 cup water
3 tbsp butter
2 pinches of sea salt

Add all ingredients except salt into a heavy saucepan.
Cook down and allow to bubble and the sugar is melted. Stiring constantly.
Add in the salt.

Serve over the cake. Yum. 
Mind the heat. Hot caramel and tongues can make for insane mouth burns. Don't ask how I know. 


Monday, February 29, 2016

Leap year!

I've always loved Leap Year. The rarity, the anticipation.

Thursday, January 21, 2016

Vanilla Bean Ginger scones

This recipe was given to me by a friend at work. She made them and offered me one during a break. 
It was heaven. Sweet and tart and spicy all at the same time.
Now to wait for rhubarb season because I used the last of my freezer supply.


3 stalks rhubarb
1/2 cup divided
2 inch vanilla bean pod
2 1/2 cups AP flour
1 tbsp baking powder
1/2 tsp salt
1/2 cup very cold butter
1/2 cup chopped up crystallized ginger
1 cup heavy cream
coarse sugar for sprinkling


425° oven
Place rhubarb in bowl and toss with 3 tbsp a sugar to coat
Place remaining sugar in large bowl with vanilla bean, flour, baking powder and salt
Mix well to distribute vanilla
Cut butter into flour until coarse sand no bigger than a pea sized butter pieces. I use my hands, its easier but you have to go quickly to avoid the butter melting from the heat in your hands.
You could also use a food processor on pulse, but that it a lot of cleaning for something that could be super easy.
Stir in rhubarb and ginger
Pour in cream and use wooden spoon to mix
Turn onto parchment and knead mixture together.
Do not over work or all that lovely butter will be creamed together and into the dough instead of pockets like you want.
Divide into two balls
Flatten and cut 6 triangles in each
Sprinkle with coarse sugar top
Bake in 425° oven for 20-25 minutes
Allow to cool 15 before frying that little piece of skin behind your teeth.