Wednesday, November 20, 2013

The Lego Birthday

When you have a Lego obsessed kid, it makes birthday parties a little easier to put together.


Each baby food jar head has crayons shaped like Lego men inside.
And Lego brick chocolate candies


The invitation. I put it together with the help of a template and then had it printed at Staples.


Lego brick cake with chocolate Lego men and chocolate bricks.
Log cakes, one white, one chocolate. Marshmallow lego tops and that was enough hair pulling out for me!

It was a huge success and he loved it, but man alive the easiest things are also the easiest to get carried away with!


Thursday, September 5, 2013

An attempt to keep the car tidy

We recently got a new vehicle. My 3rd "NEW" car in my lifetime.
It is exciting, it is beautiful and it is less than 3 weeks old and a hot mess.
I found something like this online and thought I could tweak it to actually work in my car. I sat down one evening and 2 hours later, my attempt to keep books, toys and assorted children paraphernalia in one place was finished.
The kids so far, have been great at tucking their books into the 'car library' and it's been easy to pull it out with the carseats when it needs to be used as a work vehicle.


It was really easy to put together.
Measure your seat in your car; the length and width you'd like it to be.
I wanted it to fit in the middle, between the kids.


I measure the pieces out. I made them as wide as I wanted, but made them twice as long. 
I made 3 pockets and one backing piece.  I put together each pocket, facing each set of pieces together right side in. I sewed them together and turned them face out.


I top stitched the pockets, making sure to top stitch the sides and bottom together.


I added a tie to the top that allows me to attach the unit to the car seat and ensure it doesn't end up on the floor, like everything else. 


Wednesday, July 17, 2013

Small batch fig jam

Small batch fig jam.
Doesn't sound all that impressive, but it is oh so tasty on chicken Brie sandwiches. 

I found a recipe on Pinterest, but it was in Chinese and even with the help of my very patient sister in law, I could not track it down. So I scoured the Internet looking for ideas and pulled suggestions from numerous places to come up with a super easy and yummy recipe for a small, mason jar batch of jam.

Get yourself a mason jar, how much jam do you want?
Use this as a starting point for measurements. 

I like the black figs with the beautiful red fruit, I believe they're mission figs.

Wash the figs, cut the tops off and slice in half or quarters, depending on the size of the figs. 
 I use a scale and put the jar on it. Tare the scale to "zero". Add the sliced figs to the jar and note how much is in the jar. Now add 1/2 the weight of organic raw sugar to the jar. (If you have 4 ounces of fruit, you need 2 ounces of sugar)

Add a squeeze of lemon juice to your jar, put the lid on and give it a good shake mixing the fruit and sugar together.

Leave overnight to meld.

Pull out the next day, dump contents into a pan and cook down for about 10-15 minutes. 

Clean out your jar and heat to allow a good seal. Put contents of the pan back into your cleaned jar and either seal and allow to cool or cool and serve. 

Plain fig is super for sandwiches or on baked Brie with puff pastry or pecans, but there's nothing wrong with adding a few strawberries into the figs for an amazing toast spread. 

I think I have a jam problem. Ontario brings out the best and the worst in me!


Thursday, March 7, 2013

Spicy roasted Broccoli

So T and I went out for supper this past weekend, with some work people to a high end steak house. It was so flipping good. The steak was good, the wine was good, but the broccoli, oh the broccoli was incredible. Before you call boloney on me and tell me I am making things up, you have to try this recipe. It is really, really easy and worth every second. T and I will eat a head each in a sitting. It isn't AS good for you as plain old steamed or raw broccoli, but it's not exactly a french fry!

   photo 7b885ba8-a85d-453c-a004-7761505cab16.jpg

 2 table spoons light tasting olive oil
1/2-3/4 tsp chili peppers
1/2 tbsp chopped garlic
1-2 large head of broccoli chopped into smaller pieces
a small handful of sliced almonds

Directions:

Heat the oven to 450 degrees.
Wash and chop the broccoli into pieces.
Mix together olive oil, garlic and chili peppers and let sit 30 minutes.
Put broccoli into a large bowl, pour oil mixture over the vegetables and toss until coated.
Spray a cookie sheet with a little olive oil.
Spread the broccoli even across the baking sheet so none are layered on top of one another. If any look a little dry, give them a quick olive oil spritz.
Put in the oven for about 10 minutes (watch them carefully)
Turn over pieces and mix them around so they begin to roast evenly.
Put back into the oven for 7 minutes. Pull back out, move the pieces around and add the almonds.
Bake another 2-3 minutes or until almonds are toasted. (Don't burn them, they get bitter and gross)

 I served this tonight with a piece of grilled chicken and a dollop of goat cheese and a salad.
 I really did eat all the broccoli first.

Tuesday, February 26, 2013

Little fingers and big projects

I have little kids and am a stay at home mom. I am constantly trying to find things to keep an 18 month old and a 4 year old entertained. Preferably cheaply. They have toys, oh boy they have toys, but I find that they tend to blow through toys fast. New toys are exciting and fun and played hard with, for about 2 or 3 days and then they lose their appeal. I have a toy cycle. Not all of the toys are out at all times. Things go away and reappear and become new and exciting again. This does work well for the most part, but sometimes when it is winter and it has been -30 for weeks and we have had the plague and haven't left the house things become a little stale and I go scouring for new ideas.

 photo 4fb90aa6-eb94-4670-b2bd-655d2be20cfa.jpg

I found this little gem awhile ago on Pinterest and my kids have loved it.
It does require a little bit of planning (or buying bread/milk tags) but was free and fun.
I started collecting the bread tags off of english muffins, bread, buns, sometimes potatoes or carrots (milk too if you live in an area with bagged milk) when b was only a few months old. I finally had enough of a stash (and felt confident enough that b wouldn't immediately put them in her mouth) to let them play with it.

 photo 1e6c58cb-f9d9-4545-a70b-fa6ebbb28518.jpg


It is literally just a clean, empty yogurt or sour cream tub with a hole in the lid and the object is to have the kids pick them up one at a time and put the bread ties back into the container. Not exactly earth shattering rocket science here, but it is a game both of the kids really like. b actually sat there for about 25 minutes picking the ties up, putting them into the tub and requesting to dump it out and start again and again!

Tuesday, January 22, 2013

The best banana bread

I love me some fresh, homemade banana bread.
The recipe I grew up with is a mennonite recipe, from Waterloo county, but over the years I have tweaked it and changed it to be more of what my family likes.

It really is one of the ultimate comfort foods and the best thing for almost done bananas.

 photo 85748ede-2e7c-4ff8-b1a3-99efdfddfae0.jpg


3 or 4 ripe bananas
1 1/2 cups whole wheat flour
1/2 cup white flour
2 tsp baking powder
1/2 tsp baking soda
1/2 cup low fat sour cream or low fat greek yogurt
1/4 cup milk
1/2 tsp almond extract
1 tsp vanilla extract
1/4 cup shortening
1/2 cup sugar (I like organic cane sugar, but white sugar works too)
2 eggs
1 tsp salt

Directions:

Mix together flour, baking powder, baking soda and salt.
Cream together shortening and sugar.
Add in eggs and mix well.
Add in mashed bananas, almond and vanilla extract and mix well.
Alternate mixing in the flour mixture and the milk/sour cream until all is incorporated.
Spray a loaf pan (or mini loaf pans)
Bake at 350degrees for 45 minutes to an hour until a knife inserted into the middle comes out clean.
(I bake less time with the mini pans)

**We also will throw a handful of chocolate chips in from time to time, a little semi sweet and a little milk chocolate makes for ever more goodness**


Friday, January 11, 2013

Best little doll house ever...

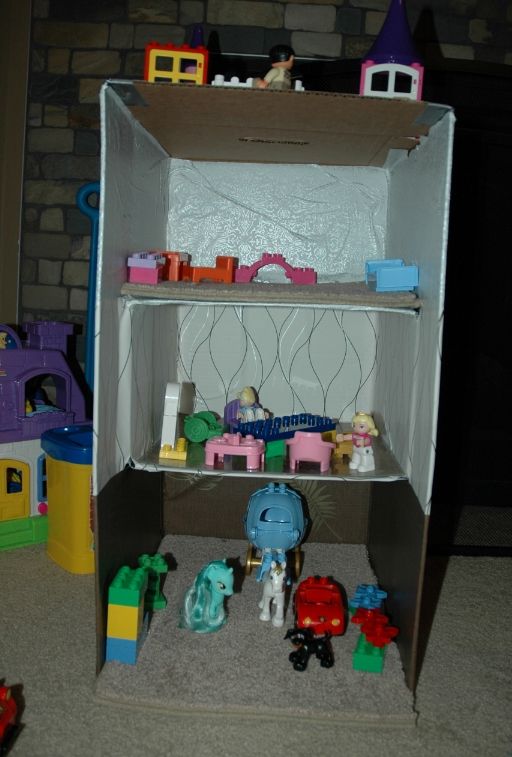
Okay, best recycled non permanent dollhouse ever maybe?
My kids have toys, the have lots of toys, but they are kids and inevitably want more.
Now, some of these requested toys will never, ever happen (ahem all the transformers ever mummy), some might happen another day and some can be made for about $20.00 and a trip to the dollar store.

The dollhouse. My kids have imaginations and love to play with lego, so instead of buying a dollhouse and a firehouse. I chose to make them.
The firehouse is not pictured, partly because I didn't take pictures and partly because it is a hot mess.
The dollhouse turned out much nicer (to the adult eye at least).

What you need:
A diaper box (or any kind of longer box)
carpet ends or samples
a piece or two of dollar store linoleum
2 or 3 rolls of dollar store contact paper
heavy duty duct tape
extra cardboard for floors


1). Cut the extra cardboard into pieces that fit into the bigger main box like floors and using as much duct tape as you dare, get those things to stay put. I used a lot of tape. both and and down. Don't be shy, you'll be covering the walls with contact paper anyhow and can hide just how much you used from your SO.

 photo 28265f21-69ed-4b23-a9ff-e816046d972a.jpg

2). Using the contact paper, cut pieces to size and stick to the walls to create wallpaper and to cover up all that duct tape.

3). Cut the linoleum to size, remove backing and stick down. This might require extra glue if you really want it to stay. I didn't add extra glue and the piece does move and fall off from time to time.

4). Cut carpet and place inside. If you don't have carpet pieces, a piece of felt works just as well and can make pretty colours for "girl" dolls.


 photo ed26c39e-5df0-446f-a7a9-bb6ab607a00e.jpg

Optional: I found in the scrapbook area fun things like little mirrors and cutouts that would be really fun on the walls as art or decorations. I didn't end up adding them because they would end up being pulled off and probably eaten. Maybe the next one?

**UPDATE: It is now April and the dollhouse/firehall are still being loved and are in semi working order. The cardboard is beginning to sag, but since it is just cardboard and duct tape, I'd say it's doing a pretty good job!**